Published On Jul 20, 2024
APPAREL 👉 https://www.dualexbuilds.com/store-1 👈
AMAZON PRODUCT LIST👉 https://www.amazon.com/shop/dualex 👈
HELPFUL LINKS 👉 https://www.dualexbuilds.com/product-... 👈
FREE BUILD PLANS 👉 https://www.dualexbuilds.com/ 👈
MY SECOND CHANNEL: 👉 https://bit.ly/30Dq39k 👈
I N S T A G R M: @dualex2x 👉 / dualex2x 👈
C L I C K T O S U B S C R I B E:
http://bit.ly/2fWl1tU
Transcript:
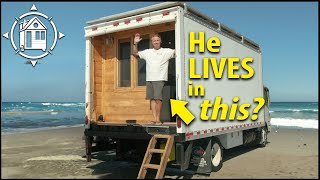
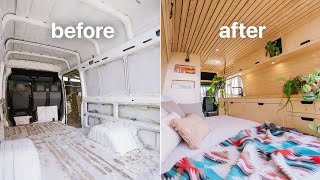
This is my 1983 Chevy G20.
A subscriber generously gave it to me, to see what I could do with it, so I ripped everything out and rebuilt it from the ground up.
I installed three solar panels on a custom aluminum roof rack and added a two-way roof vent for optimal airflow. I also replaced the two cracked rooftop windows with some fresh glass."
I decided to paint it with a new color to match the new interior design. Now lets check out the interior"
Interior cab area with new seats.
I replaced the old, moldy seats with new ones and modified them to fit the existing swivel bases. Both the driver's and passenger's seats can swivel to face the living space.
This van is small, so i didn't put a wall behind the seats, so you can enter the living space straight from the driving position
You might have noticed the new dog. Here’s his 10 second back story. His name is tyson. My father adopted him as a puppy while living in Colombia. When he passed away, the dog was 6 months old. I didn’t want the dog to end up in a bad situation, so I traveled to Colombia to rescue him, and he flew with me on a plane back to America.
He’s only 1 year old now, so you should expect to see him in the background for a very long time
At the entryway, we have a unique 12V portable fridge. It has its own batteries, which allow it to run independently of the van's electrical system. This means that you can remove the fridge and take it anywhere, and if for any reason you lose power in the van, your fridge will stay up and running.
The fridge is housed in a heavy duty locking drawer. The drawer face matches the ceiling of the van and the controls are accessible through the hole in the front."
Above the fridge is a slide out camp stove. I put the stove in this position so that it can be used both inside and outside the van.
I utilized an existing sleeper sofa as a base for the converting bed in this build.
I had to modify the couch in order for it to work for my design. It converts into a bed using heavy-duty drawer slides to make room for the back cushions to fall down over the aisle.
the base slides into the aisle, and the back cushions fold down to create a comfortable bed. There are also 12-inch deep drawers underneath and the entire couch lifts up to reveal extra storage behind the drawers."
Above the main bed, there's a guest bed that extends over the top, using a double locking drawer slide system.
The kitchen features a stone sink and a black extendable faucet with two spraying modes.
There is a utility and storage area underneath the sink.
The double doors are laminated soft close hinges and recessed finger pulls cut directly into the wood.
The countertop is a butcher block made from reclaimed pallet hardwood to save money on the build."
There are three laminated overhead cabinets.
I installed springs on the hinges so that The doors lock in the open and closed positions
The cabinet has continuous LED lighting integrated below the storage area."
There's also a 3-prong outlet on the kitchen wall for cooking appliances."
Scene 6: Tambour Cabinet and Storage
Next to the kitchen is the media cabinet. I made a tambour door from leftover solid maple. It houses shelves for an entertainment system and a hidden slide-out TV."
Push on the wall behind the faucet, and the TV slides out.
I ran Cables from the tv to the shelves and permanently mounted an HDMI port
I wanted to make it easy to plug in an entertainment system
I built a chevron brick pattern into the ceiling with an MDF panel.
It has 12V continuous LED lighting integrated into the maple trim from the front to the back of the van.
The lights are dimmable, so you can adjust the brightness with the slider switch above the side door.
The roof vent is also integrated into the trim and placed directly above the cooktop for optimal ventilation."
There is a control panel above the door that manages the main lights with a sliding dimmer switch, secondary lights, and the water pump."
I modified the back doors to be fully articulating and installed recessed storage and nets.
The utility area houses the electrical and water systems, and is accessible from the inside of the van through the sliding passthrough door near the couch
Keywords: van conversion, cargo van conversion, van life, tiny home, tiny house, mobile home, DIY van conversion, van dwelling, van living, van home, work van conversion, home on wheels, tiny home on wheels, tiny house on wheels, van renovation, van remodel, van home build, van home tour, van home transformation